This blog is all about exploring contemporary trumpet technique. I hope it will inspire you to write some amazing music for the trumpet! Below you can see an overview of the content in this blog, as well as upcoming topics I will cover.
For those who would like some passive infotainment, I also started a YouTube Series with tutorial videos related to blog posts!
Whisper tones, ghost notes, half-air half-tone, aeolian sound – composers have different ways of describing this in their music. I‘ve received several requests from other trumpet players to cover this topic, as it is one that seems to come up again and again in new pieces. (If you came here looking for pure air sounds, please check out my other post on that topic).
No matter how a composer describes it, the frustration of the players is the same – it doesn’t work well at all! In fact, we spend a lot of time (years!) as young trumpet players trying to get rid of any airiness in our sound, which makes the whole concept of an airy sound almost taboo.
When I first started writing this post, I could basically summarize my point by saying “please just don’t compose for this technique!”. And while I do still feel that way, I think the topic deserves a more nuanced treatment. Whisper tones on the trumpet are definitely a thing. There are jazz players who specialize in making a fluffy, airy sound, so its not fair for me to say “trumpet players can’t really do this”. At the same time, I just don’t know any player in the contemporary scene that can reliably produce a sound that is air and tone mixed. If you write this sound for a trumpet player, you will probably be disappointed.
Having said that, there is a relatively new product for brass players called the Whisper Penny which may offer a helpful solution – I’ll get to that at the end of the post.
Half air, half sound
Whenever I see this notated in a part, I assume the composer is inspired by woodwind instruments, which can produce a beautiful mixture of air and tone. Here is contemporary flute superstar Helen Bledsoe playing around with this technique:
Best heard with headphones!
By controlling the speed and angle of air flow, a flute player can finely control the degree to which a proper tone resonates. Single-reed instruments (clarinet, saxophone) can also control the degree to which the reed vibrates.
With the trumpet embouchure, its not so simple. A very small portion of both lips are actually vibrating, and they need quite a bit of tension and air speed to get going. There is hardly an in-between state, or gradual onset of vibration. Either the lips start vibrating (tone!) or they don’t (just air).
At the beginning I get a tiny bit of airy sound, right before the lips get going.
So what do we trumpet players do about niente entrances? I personally use breath attacks, which means starting the note without articulation (no tongue) and just allowing the tone to start once the air is moving at the right speed. The result is a soft but noticeable entrance, though still not quite “coming from nothing” as the “niente” marking suggests. In an ensemble setting these entrances can be hidden by other instruments which are playing at the same time. Mutes (like a closed wawa) can also support a beautiful niente entrance or decrescendo. So keep writing those little niente circles, composers! We can deal with them, even if its with one or two workarounds.
But Nathan, I saw some videos on YouTube of trumpeters playing with an airy tone!
Yes, its true! I’ve also seen some of these videos. Here are a few I like:
Marquis Hill calls these kind of notes “sub-tones”, and uses the technique to create a fluffy sound that adds some air into the mix. I love his is sound, which is still quite full, with a lot of tone. But even with the professional microphone set-up and listening with headphones, the air is hard to hear. Its really more of an overall sound quality than the flexible mix of sound and air that can be achieved on the flute or saxophone.
In this next video by Connor Johnson, he explains “Its very easy to flicker between silence and whisper…”. First of all, can we please take a moment to appreciate his beautiful quarter-tone double-bell in Bb(!)? Secondly – I’m glad Connor finds it easy, but I have yet to meet another player who says the same. I think its also worth noting that he’s only playing long notes, no melodic passages, and it doesn’t sound like he has complete control over the mix of air and tone. Connor’s video has plenty of other great tips, definitely worth a full watch.
The best video I’ve seen on whisper tones has to be this one from Charlie Porter. He’s so flexible with the whisper tones and although his range with them isn’t huge, its bigger than others I’ve heard. He also can vary his articulation and still get the desired sound. Its interesting that his whisper tones have almost no tone in them at all, really just enough to hear that a pitch is sounding. This is probably the closest I’ve heard anyone come to making a true airy tone with a clearly audible pitch and I wish I could do it too!
After reading all of this, you still want to write whisper tones? Here are some guidelines:
Accept that it probably won’t sound as you imagine and have an alternative ready.
To actually hear the technique, the trumpet should probably be playing on its own (solo piece or passage).
Use a microphone! If you want the air to be heard by those in the back of the hall, amplification is probably necessary.
Keep reading, I’m about to talk about an accessory which might help…
The Whisper Penny®
Disclaimer: I am in no way associated with the makers of Whisper Penny or their company. No one asked me to review this product, I’m just doing it for fun.
A colleague recently mentioned this gadget to me and I just had to try it out. It looks like a metal button attached to a thick, unfolded paperclip. The whisper penny fits into the mouthpiece and promises a nice airy sound right out of the box.
So does it work? Indeed! I can clearly hear the rushing air sound while I play and I don’t have to do anything to the embouchure to make it happen. This might be the first accessory I’ve tried that changes the sound in a unique way without the use of a mute.
OMG so jazzy!
This still isn’t the same as the flexible mix of tone and air that the woodwinds can do, but its a decent compromise if you really want an airy sound. I also feel like it works the best in the mid to low dynamic range and the middle or lower register. There are plenty of jazzy demos of this on the company’s homepage if you want to hear more.
Here are the most important things to keep in mind when writing for the Whisper Penny:
Quickly switching between whisper penny and ordinario playing isn’t possible. The penny can be quickly inserted into the mouthpiece, but getting it out requires removing the mouthpiece, pushing the penny back out (from the back), and then reinserting the mouthpiece. If I did have to change quickly, I would probably have a second mouthpiece prepared with the penny so that I only need to switch mouthpieces. This also takes a bit of time, but not as much as removing the penny altogether.
The penny adds a considerable amount of extra resistance, which means playing with the whisper penny is more strenuous than ordinario playing.
The position of the penny in the mouthpiece makes a big difference regarding the amount of air that comes out in the sound, meaning I need insert my prepared mouthpiece a bit more carefully than usual.
As with any airy sound, the Whisper Penny is probably best enjoyed with amplification.
Lastly, the whisper penny is expensive! To be fair, it does cost around the same as a new mute, but it definitely feels like a lot of money for such a small piece of metal. I wish they would actually send two for that price since its so easy to misplace or lose.
The Gold Star for Whisper Tones definitely has to go to jazz trumpeter Charlie Porter. Before researching for this post I hadn’t heard of him. He sounds great and the whisper tones are just amazing, check him out!
PS – Charlie also has a great video explaining some other trumpet “special effects”
After so many posts on different trumpet techniques I realized that information about the auxiliary instruments is a bit scattered. In this post I aim to gather all of the relevant information on the piccolo trumpet in one easy to find place. As I add more content I will update this post to make it easier for composers looking for information on the piccolo trumpet.
The Basics
A fairly standard 4-valve piccolo trumpet with leadpipes for Bb and A tunings.
The piccolo trumpet was invented to make early music, originally written for the natural trumpet, more accessible to modern players. Most instruments can be tuned to both A and Bb by changing the leadpipe. Piccolo trumpets in G, F and high C also exist, but are quite rare.
Special considerations: Most professional players will own or have access to a piccolo trumpet. On most piccolo trumpets the slides are not typically movable while playing, making slide glissandi impossible, and microtonal writing very tricky. If you want to write microtones for the piccolo, I would strongly recommend trying them out first with a trumpeter. Virtually all mute types are also available for piccolo trumpet.
Range
It is important to note that the piccolo trumpet doesn‘t really extend the range upwards in comparison to the lower instruments – rather, it makes it easier to play in the high register. So, playing a high Eb’’’ will be much easier on the piccolo trumpet than it is on the Bb trumpet, but I still can’t play much higher than that on the piccolo in general.
Endurance
In principle, most of the „rules“ in my post on endurance are equally valid for the piccolo trumpet. However, piccolo playing tends to be even more strenuous for the embouchure than the Bb or C trumpets. So, although the piccolo trumpet facilitates playing in a higher register, it is still better to treat the extreme high register with caution.
Some references for good writing for the piccolo trumpet can be found in the Baroque repertoire. Many players use the piccolo trumpet for Baroque trumpet literature, especially in modern orchestras – although it has become increasingly popular to use the natural trumpet. In particular, the cantatas and orchestral works by Bach and Handel are (mostly) good references for friendly piccolo trumpet writing.
At the very bottom of my post on endurance are a few helpful examples of piccolo trumpet repertoire that test the performer’s endurance in different ways.
Mutes
Most of the mutes listed here and here are available for piccolo trumpet. It’s important to bear in mind that playing a muted piccolo trumpet is much more strenuous than open playing, and that intonation is often a problem.
In my original post on mutes I didn‘t include any audio examples for the picc, so here are „the standard three“ mutes with piccolo trumpet!
No mute (open)Straight muteCup muteWawa mute (with stem)Wawa mute (with stem) with wawa effectsHarmon mute (no stem)
Flutter Tongue, Doodle Tongue and Growl
These techniques work just as well on the piccolo as they do on the Bb and C trumpets and the same rules apply. Check out this post to learn more.
Trills, Shakes and Tremolos
The same general rules for the larger trumpets also apply to the piccolo. I do not recommend writing lip trills for the piccolo as the smaller overtone intervals are well into the high and extreme high registers (see range above).
Glissandi
Typically, the piccolo trumpet does not have valve slides that can be easily manipulated while playing. This means that glissandi with valve slides are not an option for the piccolo trumpet. All glissandi on the piccolo (with the exception of chromatic glissandi) will need to be faked in some way using half-valve or bending.
Air Sounds
Air sounds on the piccolo trumpet sound a minor 7th lower than fingered. As with the larger trumpets, it is not possible to access the overtone series with air sounds – only one pitch per fingering is available. Piccolos with a fourth valve will have a few extra pitches to work with. The other techniques and sound colors I mention in my post on air sounds also work with the piccolo!
Slaps and Percussive Sounds
These also work just the same as on the larger trumpets but with a somewhat larger range due to the 4th valve.
Half-Valve
This works on the piccolo just as it does on the larger instruments. Check out my post on half-valve for more information.
Microtones
Microtonal playing on the piccolo trumpet is possible, though for several reasons it is quite impractical:
The vast majority of piccolo trumpets do not have valve slides that can be easily manipulated while playing.
The 7th natural overtone is so high that, in practice, only the lowest two or three can be used.
To the best of my knowledge, it is not possible to build a quarter tone trigger on the piccolo trumpet as the tube length would need to be prohibitively small.
Discouraged? There is some hope…a few methods of producing microtones on the piccolo do exist:
Alternative fingerings can provide some approximate microtones (e.g. a little bit sharp or flat).
De-tuning the fourth valve slide and using alternative fingerings will provide a larger selection of microtones. One disadvantage of this method is that it will cause the lower range of the instrument (anything involving the fourth valve) to be out of tune.
Detuning the entire instrument microtonally. This requires a bit of time to setup, and again a bit of time to readjust when returning to standard tuning.
If you want to be sure that the microtones you want will work for the piccolo trumpet its best to try them out in person with a player.
Split-tones
Split tones do work on the piccolo, but the range is even more limited than with the larger trumpets. I would suggest sticking with the two lowest intervals, the perfect 5th and perfect 4th. Even with those “easier” intervals, I find split-tones on the piccolo to be particularly strenuous and unpredictable.
A simple example, audio below.
Here is an exhaustive list of the split-tone intervals (5ths and 4ths) on piccolo in A and Bb. As with the larger trumpets, the lower pitches are easiest.
Multiphonics
In my opinion, the most interesting sounds when singing and playing come from close intervals in the low register. Because the piccolo is tuned much higher, its harder to achieve this sound. Female players with naturally high voices may be able to get more out of this technique with piccolo! Even so, I recorded a small sample for you to hear using the lower range of the piccolo in A:
Singing and playing with no mute (open).The same sample as above but using practice mute.
Pedal Tones
As silly as it might seem to write super low notes on a high tuned instrument, pedal tones for piccolo do come up from time to time in the literature. I find them to be much more difficult to control than on the larger trumpets.
Here is the approximate range I can play in the pedal register:
I’d like to start this post by making it clear that I do prefer playing the trumpet with an actual trumpet mouthpiece! Nevertheless, there are some unique sounds that can be made by using an alternative mouthpiece on the trumpet. The bassoon reed is the most common alternative mouthpiece I’ve come across. That’s not to say it comes up often – on the contrary – but it is the one I’ve used the most.
The first time I came across this technique was in Raphael Cendo’s dramatic ensemble piece “Charge!”.
There are two ways I can use the bassoon reed, either by removing the trumpet mouthpiece and inserting the bassoon reed into the leadpipe (yes, it fits!), or by leaving the trumpet mouthpiece in and placing the back of the bassoon reed into the mouthpiece. Regardless of method, it is relatively easy to make the reed vibrate, but quite difficult to control which sound you get. There is basically no dynamic range to the sounds – it’s either on or off, and always loud. Moving the valves does very little to change the pitch in most cases but can add to the wild texture.
The reed can be placed directly into the leadpipe or held against the mouthpiece.
Bassoon reed directly into the leadpipe
This method seems to produce the best variety of sounds and is a bit easier to control. It’s also the louder of the two methods, and leaves both hands free to move valves or even manipulate a mute. Keep in mind that the player needs time to remove their mouthpiece and insert the bassoon reed and vice versa.
Here are the sounds I can make with this method:
Low, undefined multiphonic
Low multiphonic based around an Ab (played on C trumpet)
Low, defined pitches that have a multiphonic character
Clear, high pitches
Rapidly and randomly moving the valves creates a wild sound:
Bassoon reed onto trumpet mouthpiece
This method can produce similar sounds to putting the reed directly into the leadpipe, but the sounds are a bit more limited, slightly quieter and harder to control. One big benefit to this method is that it takes less time to prepare, as the trumpet mouthpiece does not need to be removed. The drawback to this is that one hand needs to hold the bassoon reed up to the mouthpiece at all times.
Here are the sounds using this method:
Low multiphonic sound, no real pitch center
Low, defined pitches that can be somewhat controlled
Higher, very clear (but unstable) pitches
These are super hard to control!
Randomly and rapidly moving valves:
Low, then high
Tip for players
I bought a plastic (soft) bassoon reed for this technique. I find it much easier to use than a real reed and it lasts forever!
Even though this blog is focused primarily on writing for trumpet, I do think it is important to include a few tips about how the performance material for trumpet – or indeed, for any instrument – should be prepared. I know I might get accused of “trumpetsplaining” to composers about how to do their job, but in my defense, I did run a publishing company for several years so I do have some experience in this subject. Some of these points may be obvious, but in my experience it’s worth mentioning them all. Most important of all is to keep in mind that a player needs to read and understand the score they are given, but also be able to perform the piece live (in front of an audience!) with the material you provide.
Legend / Performance Notes
There have been several occasions where I’ve received my trumpet part for an ensemble piece and found all kinds of special notation inside… and not a single explanation! The legend was only included in the full score, which of course I didn’t have. This is super annoying, and very easy to fix:
Make sure to also include your legend in the individual parts.
Alternatively, the special notation/techniques can be explained directly in the part where they occur. Just be careful when doing this – don’t clutter your parts with too much text! The player should be able to easily read (and perform from) the part without having to filter out extraneous information. If you need a lot of lengthy explanations, it’s best to define them all on a separate page.
Staff Size
The staff should be large enough to read easily seated a normal distance away from the music stand. This distance differs depending on the instrument: trumpet players generally need extra distance because of the way we hold our instrument, whereas a horn player, for example, might need less distance.
I need about 1m distance from my eyes to the music stand.
In general, for all instruments, the stave height (the space between the top and bottom lines of the staff) for parts should be at the very least 6mm, and can be as much as 8mm.
I would also recommend sticking with this 6mm rule for performance scores (multiple instruments on one page).
Also make sure to leave enough space between staves for the musician to make markings, especially with pieces that have complex rhythms and/or many extended techniques.
Paper Format
A4 (210x297mm) Pretty much all players will have easy access to A4. Unfortunately, this format isn’t so convenient for music notation. The width is quite narrow, meaning lots of line breaks, and the height doesn’t leave room for many staves. This can lead to lots of page turns! When using A4 be especially sure to take care with staff size and page turns.
A3 (297x420mm) Most players probably don’t have their own A3 printer, but most office printers or copy shops will be able to print and copy A3 format. There are a few things to watch out for when writing in this format. A3 (portrait) can be problematic for certain instruments: think of a keyboard player having to crane their neck to look at the top line on the page. Also, the page is so high that it hangs over the top of most music stands.
A3 (landscape) has its own issues as well. The page is so wide that only one will fit on the stand at a time. When turning a page, the old page must be put onto a second music stand or the floor. This is neither convenient for the player nor does it look nice on stage.
B4 (250x353mm) My gold star for paper format must go to B4! This is a popular format for sheet music in orchestras. The page is significantly taller and wider than A4, but not so much so that it hangs over the top or prevents having two pages showing on the stand. Unfortunately, this paper format usually needs to be specially ordered and won’t fit in your typical desktop printer.
D3 (272x385mm) When I was still publishing, this format was my secret weapon for performance scores or solo pieces where page turns were difficult. The pages are not so tall that they hang over the top of the stand, and are not too wide, so it is still possible to fit two pages comfortably next to each other (in portrait format) on the stand. I suggest using this format for one-sided, unbound pages.
Tablet Format Sheet music apps for tablet combined with a bluetooth pedal have finally made hands-free page turns a reality! It’s safe to assume that most players will have a tablet with a screen size no larger than A4. By rotating the tablet 90° (to landscape format) you can magnify a portrait-format score and scroll with the bluetooth pedal, thus getting more real estate from an A4 portrait page. If your staff size is large enough to be comfortably viewed in this way, you’re probably safe! Bear in mind that not all musicians have a tablet, or are comfortable performing with one. I sometimes practice with the tablet and pedal but I do actually prefer the printed page for rehearsal and performance.
Bar Numbers and Rehearsal Letters
I’ve had many rehearsal conversations over the years that go a bit like this: “I have a question for the composer – page 4 of the trumpet part, third line down, the 13th eighth note on the line – is this C or C#?”. You would be surprised how often composers forget to include any kind of orientation in their notation, especially in handwritten scores. This can drastically slow down the rehearsal process. Even for a solo piece, bar numbers and rehearsal letters can be very important. So please, include these in your scores, parts and solo pieces!
Page Turns
I don’t know (and probably don’t want to know) how many hours I’ve spent copying, cutting and pasting together trumpet parts because the publisher or composer didn’t plan for page turns in their performance material.
To be fair to Pascal Dusapin and his publisher, there really is no good place for page turns in his short but powerful trio “Attacca” for two trumpets and timpani.
In certain circumstances, I’m able to turn the page while simultaneously playing, but it is not always possible. Careful planning of page turns is a must for proper performance material. Having a blank page (or partially filled page) in the middle of a part is perfectly acceptable if it facilitates comfortable page turns. Also keep in mind that page turns can be noisy or cause an undesired break in the musical tension, so try to plan page turns accordingly!
For pieces where page turns will be tricky no matter how you set it, consider printing one-sided on loose pages. This means the player can slide a page over (revealing the new page without hiding the old one from view) whenever it suits them, instead of waiting to turn at the end of a page. In this case I recommend using heavier paper (120-150g/cm²) for parts.
Handwritten Scores
It’s almost always interesting to see a composer’s handwritten manuscript. This often gives a clear picture of the composer’s personality or musical intention. Having said that, handwritten scores are often very difficult to practice or perform from. If you do insist on writing your performance material by hand, there are a few simple things you can do to make the musician’s job much easier:
Make sure the staff size is big enough for the player to read.
Use a straight edge for straight lines such as stems, beams, bar lines, brackets and (de-)crescendi.
Use a thicker pen (at least twice as thick!) for all beams, flags, dynamics and time signatures.
Just look at these fat, easy to read beams, dynamics and time signature by Australian composer Sean Quinn!
Always use the whole line of the staff – no half measures or empty space at the end of the line.
Don’t forget to include bar numbers and rehearsal letters!
Gold Star
My gold star this week doesn’t go to a composer, but to Faber Music’s Senior Music Editor and all around notation bad-ass Elaine Gould. In her hefty book “Behind Bars, The Definitive Guide to Music Notation”, she explains both conventional and contemporary notation in a thorough and easy to understand way. I refer to her book constantly for my own typesetting work. If you work with notation and don’t yet have this book, you’re probably doing it wrong!
When I first saw Marco Blaauw’s double-bell trumpet, I was fascinated but skeptical. The effects are great, but are they enough to justify this huge modification of the instrument? Not to mention the expense of having one built! I avoided having my own double-bell built for many years, never sure if it would be worth it. But in 2019 I stumbled upon a wonderful used Yahama C-Trumpet and just couldn’t pass up the opportunity to create my own double-belled monstrosity. Here is all you need to know to get started writing for this unique instrument!
The Basics
Most double-bell trumpets in existence are, as far as I know, in C. I have heard of some efforts to build them in Bb, but have yet to actually see one. When it comes to range, articulation, and pretty much every other effect I describe my blog, you can treat the double-bell as you would a piston trumpet in C.
Very few trumpet manufacturers have begun building their own model of double-bell trumpet, and many players will have one custom built, as I did. This means the instruments are pretty rare, and some players may not even have access to one to rent or borrow. If you’re writing for a specific player or ensemble, make sure they have access to one before you write for this instrument.
There is, however, no standardized way in which double-bell trumpets are built. So some of the effects I describe below may vary depending on the build.
Fast Color Changes
With a quick flick of a finger or thumb, the player can rapidly switch between the two different bells. If one bell is muted (or if there is a different mute in each bell), this results in an instantaneous color change that would otherwise be difficult or impossible on a standard trumpet.
As you can hear in the above example, a fast tremolo between the two bells is also possible. This means that, unlike with the standard trumpet, single-note tremolos can be achieved on any pitch.
Rough Transition
By gradually activating the bell-trigger, a player can slowly transition from one bell (or sound color) to the other. This transition is not as smooth as one would hope for. There is a clear dip in the intonation and change of sound color at the halfway point.
This can be exploited, as mentioned above, to create a half-valve effect with sound coming out of both bells. With practice, the player can adjust to the “dip” to create a smoother transition, but it’s probably not possible to get rid of it completely.
Sound from Both Bells Simultaneously
This effect could differ depending on the valve mechanism, but by depressing the bell-trigger about half way, you can get sound out of both bells simultaneously. The sound is similar to half-valve (and as a bonus, actually gives players another option for fingering half-valve passages). In general I would treat the effect as you would half-valve, knowing that it may be out of tune and/or unreliable.
Here again with harmon-mute in the upper bell. You can just barely hear the “buzz” of the mute alongside the normal trumpet sound!
Stereo Effect
Some double-bells (like mine 🙂 ) have an adjustable second bell which can point in different directions. This can add another acoustic dimension to your piece by having some sounds appear to come from a different direction. The adjustment needs to be made in advance (preferably not on stage) and cannot be done while playing.
Removing the Bell
Not every model will have a bell that can be removed. For those that do have a removable bell, you can get a unique sound by playing out of the open tube where the bell is attached. (This is much like the effect of removing valve-slides on the standard trumpet, which I will write about in an upcoming post.)
Noodling around with the bell removed.
(Keep in mind with this technique that the available pitches are limited! One day, if I have the time and patience, I will notate the available pitches and post them here).
Notation
I’ve seen a few different ways that composers have found to notate the different bells. There isn’t a single way that is superior to the others; it really depends on the piece. Here are a few examples to get you started:
Mute Indications
This method is generally easy to read and doesn’t require any new notation or symbol. By indicating which bell has which mute at the beginning of a piece or passage, you can simply continue using those mute symbols to indicate which bell should sound for any given section. However, if your piece has many rapid changes, this method may be too cumbersome.
Stem Direction
A very simple and effective notation using stem direction. Stem up is for the upper bell, stem down for the lower.
Dog Song by Yannis Kyriakides (2006)
Spectrum
The way Saunders uses bell transitions would be quite impractical to notate with the above methods. She creates a kind of spectrum above the staff with a middle line indicating the movement of the double-bell valve.
The gold star for this week goes to my friend and colleague, living trumpet legend Marco Blaauw. He certainly wasn’t the first player to come up with the idea of a double-bell trumpet, but I consider him responsible for popularizing the instrument among composers within the last two decades. He also gave invaluable input to trumpet builder Hub van Laar, one of the few instrument makers producing their own model of double-bell trumpet.
My good friend, tubist and author Jack Adler-McKean, will cringe at the title of this post. He rightfully insists that:
“a multiphonic means the same thing regardless of whether its for string, wind, brass, keyboard instrument or voice: making multiple pitches sound simultaneously through the same generative process (i.e. blowing air between reeds, hitting or bowing a string, etc.). Singing and playing is just that, contemporaneous singing and playing.”
Despite Jack’s astute observation, I’m sticking to the term multiphonics! Maybe its because “contemporaneous singing and playing” is just a long and cumbersome title for a blog post, or maybe its because the term “multiphonics” has become generally accepted as also meaning singing and playing at the same time….in any case, sorry Jack!
The trumpet is clearly built to produce one note at a time. However, there are two ways in which a player can create multiphonic(!) sounds. One of these techniques is split-tones (a true mulitphonic sound) , which I covered in a previous post. The other is singing and playing simultaneously. Both techniques are difficult and require much practice.
Do re mi…
It is possible to sing one pitch while playing another. In principle, the range of possible sung notes is the same as the vocal range of the player.
Typical vocal ranges of men and women.
It is important to bear in mind that the sung notes will be significantly quieter than a typical blown note. Without muting the trumpet, the sung pitch will most likely not be heard, but rather some slight distortion or an altered sound color. Adding a quiet mute such as a practice mute or harmon (see my blog post on mutes) will greatly increase the audibility of the sung pitch.
Singing and playing with no mute.Singing and playing with harmon mute.Singing and playing with practice mute.
Singing and playing close intervals can produce ‘pulses,’ or ‘beats’ in the sound. Depending on the register, pulses may also occur at larger intervals.
Playing a C, singing below and above.
Make sure your notation clearly specifies which notes are to be sung and which are to be played.
anfár by Arne Sanders (2013) for two trumpets and trombone Sanders uses two staves per part to notate playing and singing.
Practical Considerations
Singing and playing is quite strenuous for the player, meaning long passages using this technique should be avoided.
Pitch accuracy is much easier with static intervals, or when only one of the voices is moving. Even simple polyphony can be exceedingly difficult to achieve.
The larger the interval between the sung and played note, the more difficult pitch accuracy becomes. Intervals up to a perfect 5th tend to be fairly easy.
Notation Examples
I often see singing and playing notated on the same line. Just be sure to differentiate the note heads, as Elnaz Seyedi does here in her piece for 8 trumpets, Felsen – unerklärlich.
Felsen – unerklärlich. by Elnaz Seyed (2020) The squiggly line indicates mute movement.
[caption: the voice here is far out of my own vocal range, but the part was played by a woman when I premiered the piece with the Monochrome Project, which worked great!]
Marcelo Toledo notates the voice on a second stave in his trumpet solo Las Soledades Mudas des Mundo. Although the voice part is probably far too high for most players male or female, the wild gesture is very clear!
The first line of Las Soledades Mudas des Mundo by Marcelo Toledo.
In his brass quintet Uns-Apparatus, Timothy McCormack uses unique notation for many things including the voice. The grey geometrical figure represents the players voice. The diagonal line indicates a glissando within a given pitch range.
Uns Apparatus (2013) by Timothy McCormack
Gold Star
This week’s gold star goes to Berlin based composer Arne Sanders for his brass trio anfár. Arne writes for the voice in a way that is very easy for the player produce while creating a beautiful, floating soundscape, like the echoes of distant brass fanfares. You can hear the first two movements of this wonderful piece below!
Whenever I have a gig with my horn colleague Samuel Stoll, we inevitably get into a heated discussion about the difference between tongue slap and tongue ram. In my opinion, this is one technique with two different names. Sam begs to differ… But before I get into Sam’s special technique, lets talk about your classic tongue slap.
This effect is produced by quickly thrusting the tongue into the mouthpiece while blowing, thus blocking the air from entering the trumpet. The result is a short, percussive, pizzicato-like sound. As with other pitched air sounds, only the lowest notes of the trumpets range are possible. Also similar to air sounds, the tongue slap sounds around a major 7th lower (or semi-tone higher) than fingered.
Tongue slaps on C trumpet (with a C as reference pitch).
Slaps on the piccolo trumpet also produce a pitch around a major 7th lower than fingered.
Tongue slaps on piccolo in Bb (with a Bb as reference pitch).
As with other special sounds, be sure your note heads for tongue slap are clearly defined in a legend or directly in the score itself.
Lip Smack
…now back to my discussion with Sam Stoll. He considers the above technique to be a “tongue ram”, since the player is ramming their tongue into the mouthpiece. His version of a slap is what I will call here a lip smack. I have tried many times over the years to reproduce this on the trumpet with no success. Indeed I’m not even sure I can really describe the technique in question. In fact, the only person I have ever heard do this is Sam. So, dear composers: please don’t write this for the trumpet! But I do think it’s worth posting this short video of the amazing Samuel Stoll and his unique “lip smack”:
Palm Slap
Slapping the mouthpiece with the palm of the hand produces a percussive sound similar to that of the tongue slap. Unlike tongue slaps, the resulting pitch is strangely almost exactly and octave lower than fingered. Many players do not like this technique as it can cause the mouthpiece to get stuck in the lead pipe, or even cause irreparable damage to the mouthpiece or lead pipe. But, with a bit of practice and preparation it can be done fairly safely. Achieving rhythmic accuracy is trickier than with the tongue slap. In general I would suggest avoiding this technique and using the tongue slap instead.
Palm slaps on C trumpet (with a C as reference pitch)
Valve Sounds
A pitchless percussive effect is possible by simply depressing the valves without playing. This can be done slowly or quickly. The effect is fairly quiet and may be difficult to hear depending on the context.
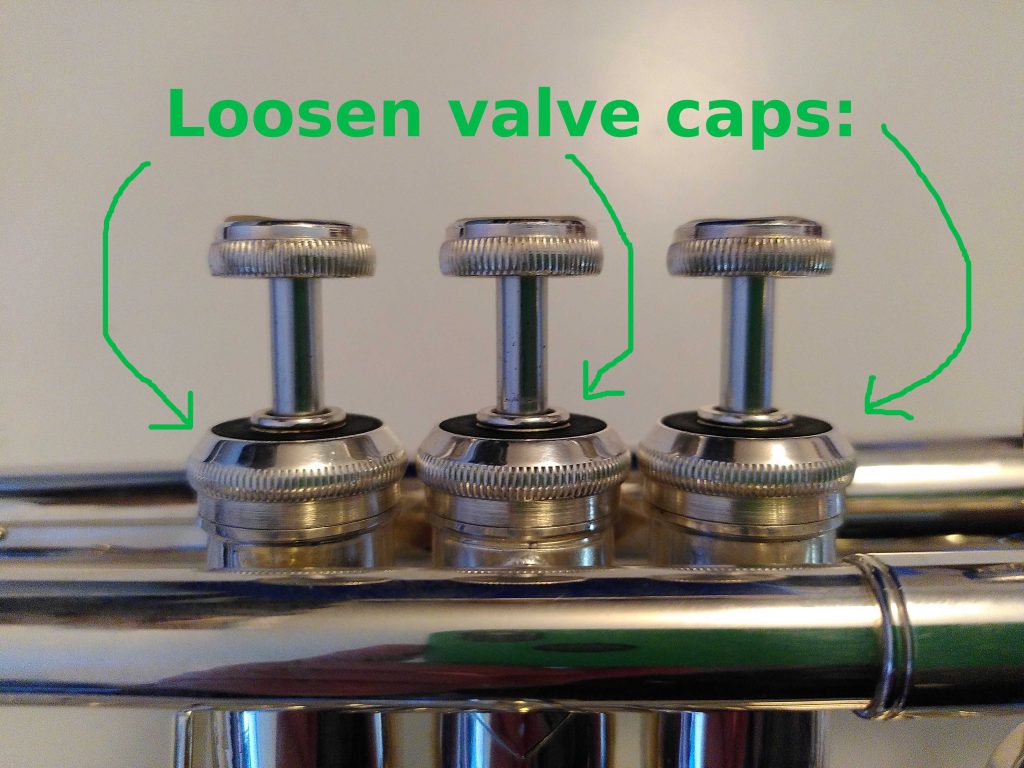
A much louder percussive effect can be created by slightly loosening the valve from the valve casing. I actually really like this effect, though no one ever uses it! Keep in mind a player will need a few seconds to prepare for this effect as well as a few seconds to tighten the valves for normal playing.
Striking the Instrument
I always cringe just a little bit when I see this in a trumpet part. Yes, the trumpet is made of metal, but it is also surprisingly fragile. Even small strikes on the instrument can cause dents and scratches. As a player I would prefer not to risk it! But if you must insist on having the player hit their instrument, here are some tips:
The safest object with which to strike the instrument is the player’s own finger or fingernail. This gives the player full control over the force of the strike and is unlikely to cause any damage. The most resonant part of any trumpet is likely to be the bell.
In Olga Rayeva’s solo for trumpet, “Seven Messages Heard in a Dream”, she has the player rapidly strike/scratch the bell with fingernails creating a soft shimmering effect:
In general, the object with which you strike the instrument should be lightweight and only made of wood, plastic, rubber or something similar. Here are a few ordinary objects that can be used gently:
A wooden or plastic pencil
A large eraser
Paperclip (plastic or plastic-coated)
Wooden or plastic clothes pin
Gold Star
The Gold Star for percussive effects this week goes to Marton Illés for his new piece for 8 trumpets titled Rez Ter. He combines valve sounds and different (safe!) percussive sounds made by striking the instrument in different places. I recorded this piece in December 2020 with the Monochrome Project. The recording has not yet been released, but below is an excerpt with lots of lovely percussive effects!
Glissandi on the trumpet are kind of a mixed bag. On one hand, the trumpet can produce the super cool falls and doits that are familiar from jazz music. On the other hand, it’s nearly impossible to produce a pure glissando over intervals larger than a semi-tone. In any case, there are several possibilities for producing glissandi on the trumpet. Since each technique produces different results, the composer may want to specify which technique is preferred.
Chromatic
A chromatic glissando uses all (or most) of the tones in between the starting note and the end note. For the player this is generally easy and requires no new techniques. Chromatic glissandi can be used for intervals of a major second or larger. Depending on the time given for a glissando and the size of the interval, the player may play all or just some of the notes in between. The glissando can either be written out or implied with a glissando line. If the glissando is not written out, ‘chrom.’ or ‘chromatic’ should be added above the glissando line for clarity.
Slide Glissandi
The first and third valve slides can be used to produce ‘pure’ glissandi with no breaks. This is, however, only possible for intervals of about a minor-second or smaller. These small glissandi are possible on almost all minor-second intervals on the trumpet, though an alternate fingering is almost always needed on one or both of the notes. In the example below, G (which is usually played open) is played with 2nd and 3rd valve (the fingering for Ab) with the 3rd valve slide extended, allowing for a clean glissando up to the Ab. For the few intervals not possible with this technique, half-valve glissandi or bending the pitch with the embouchure (see below) is recommended.
Glissando from G to Ab with alternate fingering and 3rd valve slide.
Special Considerations: The slides used for slide glissandi are manipulated with the left hand, which can hinder other techniques that use the left hand (microtonal playing, mute manipulation), so make sure you only use one of these techniques at a time!
Slide Glissandi with Quarter Tones
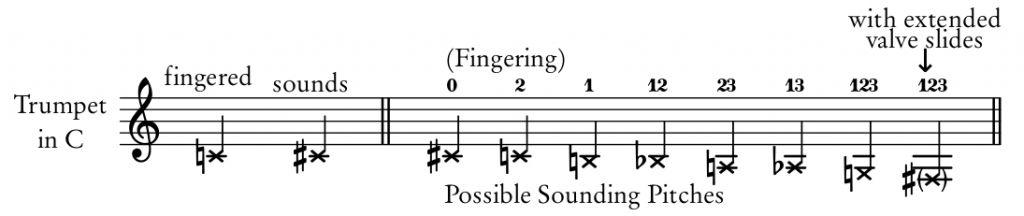
Slide glissandi over intervals larger than a quarter tone that begin or end on a quarter tone are generally only possible in the higher register. This is due to the fact that most quarter tone playing already requires adjustment of one or both valve slides, leaving little room for slide glissandi. Quarter tones in the high register that use the 7th overtone (and 1st or 3rd valves) are an exception to this rule.
There are also some alternate fingerings in lower registers that would allow for small glissandi starting or ending on quarter tones. If you are planning to make extensive use of this technique it may be worth considering using a trumpet with a quarter tone valve. Definitely check out my post on microtones to learn more!
Half-Valve
Half-valve glissandi can generally be used for all intervals. This is the most flexible of all glissando techniques and is also very simple to produce (see my post on Half-Valve technique). If no other indication is given for a glissando, this is the technique I would probably use for intervals larger than a semi-tone.
The half-valve sound is noticeably different than the normal trumpet sound, giving the glissando a particular color. Different half-valve combinations can be used for the same glissando, allowing the player to choose whichever is the most effective. Generally the half-valve glissando is ‘semi-pure,’ meaning some harmonic breaks may occur if the interval spans several overtones. ‘Half-Valve’ or ‘HV’ can be written above the glissando for clarity or explained in a legend.
Hlaf-valve glissandi
Bending
A player can also ‘bend’ a given pitch up or down using the embouchure alone. In the low and pedal registers the pitch can be bent up or down quite far; in the middle register pitches can generally be bent down about a whole step; and in the high register most players can only bend pitches a half step. Bending upwards is not so easy in the middle and high register, this is generally only used for intonation correction. When bending pitches, much of the sound quality and resonance is lost and the goal pitch will have a different sound quality from the starting pitch.
Pitch bends
Glissandi in the low and pedal registers are made easy by bending, though pitch accuracy will become more difficult (be sure to see my post on pedals).
Glissandi in the pedal register
Overtone Glissandi
A glissando that is unique to brass instruments is created using the natural overtones of the trumpet. As long as there are available overtones in between the starting and end pitches, the direction can be up or down. The more overtones available in between, the better it sounds!
Combining Techniques
For some intervals it may be most practical to combine glissando techniques to produce the best result. This is perhaps less important for composers to notate, but good to know that it is possible. For larger intervals the most common combination is overtone and half-valve. This produces a fairly clean sounding glissando with less gaps.
For smaller intervals, like a major 2nd, I would tend to combine half-valve with slide glissandi. In the example below I can start the glissando very cleanly to give the illusion of a pure glissando and gloss over any gaps with half-valve.
By using the 3rd valve (alt-fingering for E) and extending the 3rd valve slide, I can play an Eb and cleanly gliss. to E. HV gets me the rest of the way to F.
With all those choices, you might be a bit uncertain about writing glissandi for the trumpet. My advice is to just go ahead and write them! Just keep in mind that they might not always sound as clean as you imagine. As always, its best to seek out a player who can try your music in context and help you find the best solution.
In classical trumpet playing, half-valve sounds are usually unintentional and a sign that you aren’t fully depressing the valve, or that you seriously need to oil your valves because they aren’t coming back up fast enough. This “mistake” has been taken by composers and turned into something beautiful!
Half-valve sounds are produced by depressing one or more valves partially, creating tones that sound muted, matte and do not project very well – quite distinct from a normal trumpet sound color. This technique tends to be most effective with piston valves, though it can also work with rotary (German style) valve systems.
Half-valve can be notated simply by writing ‘half-valve’ or ‘HV’ above the desired note. If the technique is used often in a piece, this may be too cumbersome, and you may want to come up with an alternative notation.
Hlaf-valve notation by Lim, Saunders and Stockhausen.
Virtually all pitches available on the trumpet (including pedal tones) can be produced using the half-valve technique. Tongue effects like flutter tongue can also be easily combined with half-valve.
With just a quick change in fingering, a player can go between a ‘normal’ sound and a half-valve sound. This allows for very rapid changes of tone color.
Tones produced with half-valve are also very flexible, giving the player freedom to bend the pitch in either direction. Stay tuned for my upcoming post on that subject for more on these (and other) types of glissandi.
First a HV glissando with a clear start and end note; then just a smeary gliss. with no clear pitches.
Half-valve technique is flexible and easy to produce, but it does have its limitations. Finding the precise valve position to produce a particular pitch can be difficult, and the pitch and sound color can be very unstable when the precise valve position is not found. For this reason fast half-valve passages that require precise pitches should generally be avoided unless you don’t mind the result being somewhat muddy and vague.
Half-Valve Split Tones
Combining split-tones with half-valve can produce a split-tone effect with intervals otherwise not possible with conventional split-tones. The result is difficult to predict or control, but does sound quite cool! My full blog post on split-tones is here.
Half-Valve Air Sounds
Check out my post on air sounds for more information about this cool effect!
Adding Mutes
While the special sound color of half-valve is definitely best enjoyed unmuted, there is a slight change in sound color when playing half-valve technique with a mute. Test some mutes with a player to find out which ones work best for your piece.
First I play unmuted and oscillate between ordinario and half-valve, then I do the same with a straight mute.
Gold Star Example
My gold star example for the use of half-valve technique goes to Chinese composer Yangfan Xu. In her piece “Qing Yi” for trumpet and choir she uses the half-valve sound of the trumpet to imitate the traditional Chinese instrument Suo Na. The half-valve passages are melodic but not too fast and the pitches are easy for the player to hear in the context of the piece.
Qing Yi by Yangfan Xu (2018)
Qing Yi excerpt
And here is a video of the full perfomance of the piece, recorded live in 2018 at the Choral Chameleon summer institute.
Standard half-step trills are easily played across the trumpet’s entire range using the valves. Whole-step trills can be tricky depending on the pitches and fingerings used. Listed below are the more technically awkward whole-step trills on the trumpet.
Awkward does not mean impossible! All of these trills can be performed, they just might not be very clean or fast.
Tremolos and trills over intervals larger than a whole step are also possible, though they become increasingly difficult as the interval expands. Tremolos across large intervals are clumsy and difficult to play quickly and cleanly.
Lip Trills
A lip trill is achieved by rapidly oscillating between two adjacent overtones of the same series. Lip trills are most commonly used in the upper register, though are also possible in the lower notes of the overtone series. As with trills and tremolos, the larger the interval the more difficult and clumsy they become.
Other pitches are also possible with lip trills using the six other fingering positions.
Shakes
The shake technique clearly has its origins in jazz. This technique is very similar to a lip trill, but instead of using the embouchure to achieve the trill, the player actually physically shakes the instrument while playing. The result is a somewhat messier and wilder trill than the lip trill.
Single-pitch Tremolos (Bisbigliando)
The term “bisbigliando” was originally used in harp notation to indicate a tremolo on two strings with the same pitch. On the trumpet, you can achieve a similar effect by rapidly switching to an alternate fingering and then back again on the same pitch. The intonation and sound color of the two fingerings is usually slightly different, which is why this is also sometimes referred to as a “timbral trill”.
In the example below the player would switch between the normal fingering for g´ (open) and the alternate (valves 1 and 3). Note that not all pitches have alternate fingerings. Because tremolo notation can look like flutter or doodle tongue, the word “tremolo”, “trem.” or “bisbigl.” should be added for clarity.
Bisbigliando on c’. Notice the slight difference in intonation between the two fingerings.
The valve tremolo was famously used by Stockhausen as a means of articulation on a single note in much of his brass writing:
If you absolutely need a single note tremolo on a pitch not listed above, don’t despair! Here are a few alternatives:
Doodle tongue – sounds a bit like a tremolo and is easy to implement on any pitch.
Half-Valve tremolo – while this might not work perfectly on every note, its a viable alternative for most pitches not listed above
Double-Bell tremolo – by rapidly switching between bells on the double-bell trumpet, a single note tremolo is possible on any pitch. I certainly wouldn’t suggest writing for this instrument solely for that effect, but I still thought it was worth mentioning here.
Gold Star Example
In this notable (and harrowing) excerpt, Ligeti makes good use of the trumpet’s abilities in regards to trills, lip trills and tremolos.
….if yes, please consider sending me a small donation!
I spend many hours putting together new posts, recording samples and acquiring the neccesary licenses to post excerpts from published scores. Your support helps me continue!